About Me

Thursday, April 30, 2015

A sense of Self

There are other things I want to write about. My me-made-May pledge is one of them, as May is only two days away and I'm not yet sure how to finalize my pledge. I have some finished garments to show, and patterns I would like to discuss, and a few meters of fabric that I purchased and can't wait till I'm able to wear, and a Morris blazer in process. And I'm also going to a conference and would like to share my me-made wardrobe decisions and...

Despite all the sewing-related thoughts I have throughout the day, I haven't stitched a seam in a few days. Life has the tendency to explode on me from time to time, and when it happens it's chaotic and tiring and results in me feeling a great loss, as if I have lost some sense of self.

Graduate school has its ups and downs. Few months ago I was stuck in an endless tunnel of experiments that just don't work. Also during the war the MRI system I work with was down (due to safety reasons) and I lost precious time. I had no energy and no motivation and felt like the entire world was against me (the entire world, with the exception of my partner, best friends, and pHD supervisor - this is actually a large group!). Lately things are looking different. I'm not sure yet whether my results are enough, but I'm feeling a change of pace and also the ability to look back and have different perspective on things.

However when things are chaotic and I don't sew as much as I would have liked I always worry that it always will by like that. That the pace will not slow down, that I will not regain my sewing energy, and that the fabric I love will never be made into a complete garment (rather than the pile of UFOs I currently have).

That fear is taking up more time than the time it takes to finally sew the binding into that last Strathcona or stitch the waistband to my newest Moss skirt, but it still holds me back. Mostly I'm afraid that my sense of self is depended on so many different things, and given that a perfect life balance is not realistic I always have to leave part of me neglected, that part of "me" that belongs to the activity I have no energy for.

Thins change all the time, life is dynamic. Achievements are counted in years and decades, not in the couple of hours it takes to sew a t-thirt. I know all that, and yet when I can't have it all I find myself searching for that sense of self that was left neglected on that lost piece of puzzle.

Is sewing part of your definition of "self"? How do you feel if you don't get to sew for longer than you would have liked? and what will you make once you finally are able to turn the machine back on?

Friday, April 24, 2015

Strathcona by Thread Theory - endless possibilities

Hi all!

I know Matt and Morgan from Thread Theory have a discount on their Strathcona pattern and since I've made this pattern many times I thought I'd share my versions. While this pattern is designed for men, my first make resulted in one of my favorite loose-fitting shirts ever and many versions followed. Some are still in progress, waiting for mojo (=I can't bring myself to cut the welts, as you'll see below) or for a change of thread color on the overlocker. While I've never blogged about these makes, I did try to take some pictures. Some pictures are rather old, and some are selfies in front or our mirror (dirty-mirror selfies used to be legit blog pics a few years ago!), but it will have to do.

Following my first try, I used the only knit fabric in my stash at the time to make this version: 

  
The fabric was bought to make D a Strathcona but I really wanted to make another version for myself and the only garment he ever asked me to make him is a button down shirt (I'm waiting for a pattern so D is still waiting for a shirt), so I went for it. This version is still un-hemmed but I wear it all the time. I added sleeve bands and narrowed the sleeves, and I like the puffy look of it. I started with size M but changed the shoulders and narrowed both the back and the front, so I have no idea what size it is now. D is wearing his jeans version of the Jedediah pattern, btw.

I also played with the back neckline, tried to lower it considerably but the end result is more of a low boat neck rather than the design I was going for: 


Even though I wanted a lower back neckline I still like the end result because it's low enough to be irregular but high enough so the bra doesn't show. The pictures were taken during a hike we took, so they demonstrate how well this tshirt fits in my wardrobe. 

Following this successful experiment I went on and made another one: 


I tried to avoid unfortunate pattern placement, but got into some trouble when I realized the pattern was completely off grain. It took me a while to identify the problem, it appears that the vertical and horizontal lines don't meet in exactly right angle. As a result I couldn't win this game and ended up with a weird pattern going diagonally. I got used to it after a while, and people don't seem to notice it anyway. Both tshirts are in constant rotation and have the perfect silhouette for dance lessons (I dance flamenco).

At this point the weather started to change and the days became colder (yep... It was 6 months ago). Considering I had only a few winter clothes (have no idea how this happened) I had become an overlocker monster and started sewing knits as if my life depended on it. I went to the textile district with the sole goal of purchasing enough knit fabric to create a  variety of winter clothes so I can lengthen my laundry cycle (my life-goal is 2 weeks, currently at 10 days so I'm getting there!). I wanted to play with the Strathcona and see how it would look in different types of fabric, and also expend the variety of materials with which I work. For the next make I tried a sweater knit in purple, and the result is still one of my favorite garments and is in constant rotation:


Worn here with my moss skirt, a garment I finished ages ago but never written about, and secret pajamas in the form of fleece leggings. Other accessories are a grumpy face and tired eyes, it was cold, early in the morning, and a work-day, so... I'm not giant, btw, our fridge is rather small. I love sleeves in unusual lengths so for this version I used the original sleeve length of the Strathcona, which is super long for my frame. I added cuffs and I like the extra material bunching around my wrists. The cuffs also help in preventing wind from freezing me on my way to work so it's a win!

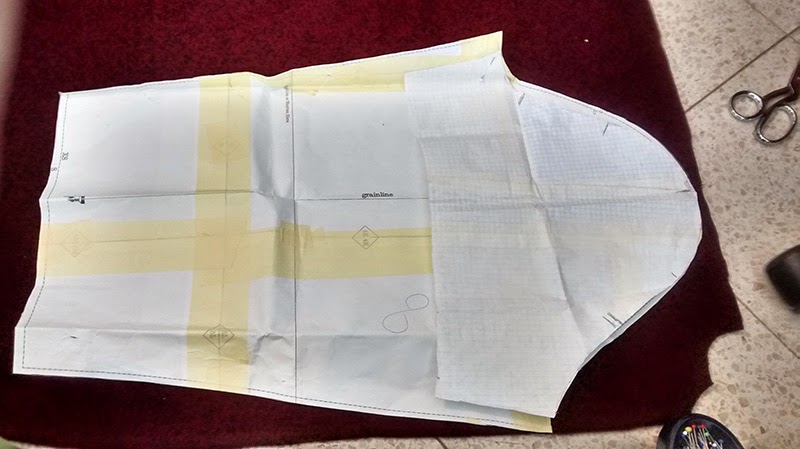
After yet another successful version I wanted to push it, test if I could hack the pattern and create raglan sleeves. 

The first result of this experiment is this grey sweatshirt (if you look close enough you'll notice I'm wearing it over the purple version, and a red version which was a fail):

 
When I first tried it on, I felt I was wearing an armor rather than the cuddly grey sweatshirt I was going for and I didn't know if I'll keep it or give it away. After 3 months of constant wear the fabric had softened considerably, and I finally hemmed it. The fabric is a bit strange: it has almost no stretch (except for the mechanical stretch of the knit), and it unravels a bit which is very unusual for a knit fabric. 

To test the raglan again I tried another version with sweater knit:


I used matching ribbing (all the starts aligned and I found matching ribbing!) and matched the pattern across the raglan seams. I wear it and I like it, but not as much as the purple version. in hindsight set-in sleeves could have been a better choice for this fabric. Also I'm freezing in this picture, it was taken during a snow day while I was sewing brocade ultimate trousers and wanted a picture to help me judge the fit. It's a story for another post though.

After experimenting with the raglan variation my verdict is - next time I'll use the Linden pattern. Jen is an alchemist when it comes to everyday clothes and I want to try her raglan pattern!

I did however tried another hack of the Strathcona. Using my raglan variation I wanted to make a bomber jacket. I had a blue version of the grey fabric in my first raglan try and floral neoprene in my stash, both perfect for this experiment. I hacked the raglan some more, and while both version are still in progress I think I'll like the end result:


both versions are worn here with go-to knit pants, a pattern I'll review soon. In order to achieve better fit across the shoulders I added a shoulder dart, and narrowed the front some more. At this point there's barely any resemblance between the current pattern and the original Strathcona, I guess you can call it pattern evolution. 

I'm stuck here, because I can't decide on the welt pockets placement. Additionally I want to draft the pocket bags in such a way they'll be caught in both the zipper seam and the bottom band seam. I still need to draft the facings and decide what to do with the lining. Both versions are stretchy, and I don't want the lining to compromise mobility. I think I'll do a partial lining - only line the body of the jacket and leave the sleeves un-lined. I'll add a pleat at the back to increase mobility. I'm in no rush, though, and don't mind having a few UFO's sitting around waiting for my mojo. I rather take my time than end up with a garment I'm not happy with.

The weather is colder than expected, but my sewing list includes a couple more versions of Strathcona with short sleeves and cuffs once I find fabric I like. I love everything about this pattern and am looking forward to future variations.

Please tell me I'm not alone here with my womenized Strathconas!


Thursday, April 9, 2015

Fabric bowls for protecting your favorite pans

Hi all!

I went all out with spring cleaning this year. As in Marie Kondo spring cleaning. It was this huge snow ball, starting with the regular spring routine of going through my fabric scraps, cleaning the closets, unpacking summer clothes etc. And then I ran into her book during an Instagram break and all hell broke loose. Suddenly it hit me - I CAN get rid of all the STUFF I don't like. I don't have to keep it. 

So I started raiding the closets, giving away most of the stuff I don't like just because I don't like it. It took me a few hours to realize most of the items I dislike were never chosen by me. Being the youngest child I always get hand-me-downs: bedding, kitchen stuff, clothes (!), and I have this voice telling me that if I already have something, it must be good enough, why should I replace it?

I agree with this voice most days, but this year I decided some things must be replaced. Starting small, I gave away the two frying pans we have, and replaced them with a good ceramic pan I wanted for the past 5 years.

Our storage solution for pots and pans is something like this:


We use(d) kitchen towels to protect the pans from scratches while they are crammed and stacked in our cupboards. I hate this solution, both because it's messy, and because I really like this owls towel and would like it to be used as a towel, not as a pan protector. So when we got this nice new ceramic pan I thought I could sew a fabric bowl to protect it, instead of this mess.

A short(ish) pinterest search led me to this tutorial from Imagine Fabric, showing how to quickly sew a fabric bowl. I created a "quilt sandwich" with two layers of fabric and cotton batting between them. I used the widest and shortest zigzag stitch for attaching the "petals".

My first go was for our wok, following the instructions as is:


While it undoubtedly looks better than the towel, it felt a bit sloppy and not sturdy enough. So for the next two bowls I free-motion quilted the layers before creating the 3D shape. I additionally bound the edges instead of using a zigzag stitch. I fought the desire to hand-stitch the binding, as with traditional quilting, convincing myself nobody will ever notice the visible stitches. 


The bowels are sturdier and hold their shape well without being too stiff, so it's a win! 

Costs:
fabric: a present from a friend's mother
batting: 75 ILS for a meter, used about a 1/4m so, around 20 ILS (~5.08$)
thread: 1 spool, 3.8 ILS (~1$)
*I used an entire spool for the 3 bowels - quilting and tight zigzag stitching uses up a lot of thread.
Total:
~24 ILS = ~6USD

 Happy spring cleaning everyone!


btw - I know a lot of garment sewers don't do home-dec. I always hesitate before writing about home stuff as I do see myself as primarily a garment-sewer. However I do make everything for the home as well, and I find such projects refreshing and interesting when combined with more traditional garment sewing. I am planning a review on the go-to knit pants view B, a pattern I couldn't find a lot about, so stay tuned! (it will not take me 4 months, promise). 

Sunday, December 7, 2014

Newcastle cardigan for ME!


Hi all,
It's been a while...
Thing here are argg... complicated. The rain had washed away memories of war but the violence here hasn't stopped and it appears like difficult times are ahead. I must have started this post a million times but each time I feel like a party crusher, writing about the bad stuff in a community devoted to the beautiful parts of life. We don't get to choose our circumstances, and I have no control over other people's behavior, but I cannot ignore the reality, this simply isn't me, so here we are. Needless to say all the bad stuff happening around me kind of killed my mojo, and my thoughts were all over the place so I couldn't concentrate on sewing "appropriate" stuff. More specifically I couldn't even imagine sewing wovens, and I've already gone through most of the knits I had, so my choices were limited. I hate when this happens, especially when I really need to sew! Luckily I found the world's greatest and softest fabric (the fiber content of which is unknown, but it looks like wool from the outside, and is brushed from the inside). I made D a  Necastle cardigan (in grey) from the same material last winter and he wears it all the time, it's soft and cozy and perfect for cold winter days. When I spotted the same material in one of the stores I bought enough for two cardigans, one for me and one for my dad (this will take some time, I'm putting off printing the pattern again and cutting a different size). 


While this is undoubtedly a Newcastle cardigan In addition to the Newcastle pattern I also used the Strathcona pattern, a pattern I've used before, as a template for the shoulders and sleeve seams. I figured it will be easier than messing around with sleeve curves, and will probably produce better results (as I know from trying on D's cardigan that the shoulders were too big but the side seams were fine considering this is a loose fitting cardigan anyway). 


I placed both pattern pieces on the fabric, cut around the shoulders according to the Strathcona, and around the side seams according the the Newcastle pattern.


I wanted to do the same with the sleeves, I can't remember what went wrong but I must have made a mistake while cutting because the sleeves were up too narrow (and narrower than the original Newcastle pattern). Next time I'll know better...

Next I interfaced the required pieces. I don't know were I read about this technique, but for the interfacing instead of simply fusing it and then binding the exposed edges, I first sewed the fabric and interfacing right sides together:


Then turned them right side out and understitched to make sure the seam will roll towards the interfacing. 


Then fused them together making sure the seam line rolls inwards.


The interfacing is completely invisible from the right side, with no exposed edges!


This fabric is extremely thick and the width of all layers at the shoulders is about 1.2 cm. After breaking two (!!) Bernina stretch needles I went back to a universal needle and it worked well for the remaining seams. I used stretch stitch on my regular machine and didn't use the overlocker.
I took extra steps to stable the shoulders, by attaching a strip of woven material to the pressed open shoulder seams:


I did the same with the previous cardigans and it adds some structure that I like on this type of a garment. 

The last extra step was taking off about 0.125" around the undercolar, to account for turn of cloth.


While I put a lot of effort making sure the seam line will be invisible by understitched the undercollar as well as by trimming it, at the end I prefer wearing the cardigan with the collar up, so the understitching is visible but I'm sure nobody notices.  I think next time I'll re-draft the collar for a properly standing collar.

Despite all the hiccups this cardigan is one of my favorite makes. The fabric is soft and cozy, the color is surprisingly flattering, and the slightly androgynous silhouette is right up alley. 

The only thing that really bothers me is the fact the left front appears longer than the right front, even though they are exactly the same length! (the cuffs, however, are not even close to being the same size, I have no idea how this happened but after hand-stitching them I couldn't bother taking them apart. BTW I didn't use the Newcastle pattern for the cuffs so this mistake is totally my fault).

I have more of this material in dark grey, which will turn into another version of the cardigan someday soon. For the next make, I'm thinking of adding a curved band at the bottom to add length, a standing collar and... lining. I still need to figure this one out because while I don't need the stretch at the back, I do need it at the elbows. Suggestions?


Costs:
fabric: ~two meters, 35 ILS per metter = 70 ILS (~17.6$)
two broken needles: 10 ILS (~2.5 $)
5 buttons: 4 ILS each, so 20 ILS total (~5 $)
thread: 3.8 ILS (~1$)
pattern (cost per make) : (that's a bit complicated, but:)
I bought the parkland PDF collection for 70 ILS (17.6 $). For this make I used 2 out of the 3 patterns, so it's 2/3*70 = 47 ISL (11.8$), but this is my 4th Newcastle and the 4th time I use the Strathcona, so I'll divide it by 8 to get: 5.9 ILS (~1.5$).

Total cost: 109.7 ILS (27.6 $)

Money well spent :) 

Happy sewing!


P.S. I thought long and hard about the entire Photoshop thing, and decided I will not edit my photos (apart from (strategically) cropping them). Since I don't have a camera all pictures are taken with my phone by D before I go to work, so this is as real as it gets :)

Tuesday, November 4, 2014

Sewing "Chocolate"


Well, this post could have also been named as "I have super powers!" but we'll get to that in a a few lines...

Last night I came home "a bit" frustrated from consecutive tough days at work. If you follow Erin's series on graduate students around the sewing community you are probably familiar with the fact graduate students are frustrated A LOT. I guess if you're human, and have a day job, you may also experience this frustration from time to time. Despite how much I love my job and how important I think it is, I can't avoid frustration when things just don't work.

Anyway, I came home and wasn't feeling like doing anything fun (or anything at all). I had about an hour before bed time and I felt like I didn't have the mental energy to start with the pants I've already cut, or cut another project. Looking around me my eyes fell on a scrap of knit fabric, left over from a long sleeve t-shirt I made over the weekend. Instead of shoving it into the (overflowing) scrap drawer I took out my undies pattern and made myself new undies from the scrap. 

It made me feel better.

It took about an hour, during which I could clearly think about anything and everything. My first thought was it felt like I was sewing chocolate. You know, when in doubt - eat chocolate? So I did something else that made me feel better, took longer to complete than what it takes to eat some chocolate, and at the end I have a new pair of undies!

Then I thought that if I can just make myself a new pair of undies in under one hour, I must have super powers. It was not the first pair I made (though I changed a few things, detailed below), and I should make some more as my wardrobe still hasn't recovered from the lost luggage in Sicily a few months back. Yet the idea I can use some scraps and elastic and make myself a new pair of undies is not trivial. The fact we can sew our own clothes isn't trivial. It takes dedication and perseverance, and the strength to deal with frustration when things don't work. Just like in real like, only on a smaller scale. 

Specifically, undies are important to me as I'm very particular about what I like to wear. I feel liberated that I can make it myself and I'm no longer depended on retailers, trends, and whatnot. 

As for the actual sewing: Up until last night I always used fold-over elastic. I wanted to try something else, as the fold-over feels a bit to thick and stiff. This time I used decorative elastic for the waist and self fabric for the leg bands. The pattern is something I drafted from a favorite pair a while back. I used the overlocker for the 3(!) seams, and regular zigzag stitching to attach the elastic with a stretch needle. I prefer the result over the fold-over with 3-step zigzag. 

Today is a new day, and I hope it'll be less frustrating. At least I now have new underwear to help me conquer the day!

Monday, October 20, 2014

Internet and "on-line sewing"

I read Morgan's last post about her week without internet with great interest. There are times in life when I would prefer to immerse myself in the fantasy world of the internet. Less than two months ago we've been through such a period of time during the war in Israel. Scrolling Instagram, reading blogs and collecting inspiration on Pinterest helped me disconnect for short periods of time from the awful painful reality of our being at that time. We were mostly cooped up in the apartment as missile alarms could go off at any time of the day, and while in our town it was relatively safe our families in other parts of the country had them several times a day. Looking at pictures of other people from the sewing community having normal daily fun and continuing with normal daily sewing activities helped me remember that this time will past and I, too, will able to go back to my normal life. 

This advantage of the internet, helping us get inspired by looking at other people's daily activities, normal routines and achievements, is a complicated one. Of course this sort of inspiration is a good thing, but given the edited nature of the content we consume on the internet, instead of being inspired we can end up feeling bad with ourselves and with our seemingly less glorious lives. Looking at pictures taken at special fun moments may give us the illusion that every moment of every day may look like this for everybody else, while we're stuck in a relatively boring reality. This may result in disappointment with our own lives, even though we may subjectively enjoy it very much. 

Another point is that by looking at what other people are sewing and being inspired by their choice of patterns and fabric, we may sometimes find ourselves wanting to make the exact same thing rather than choose our sewing projects in a way that is most suitable for our lives, workplace, and personal style. This may be especially more relevant nowadays as personal sewing blogs become more professional and photos are better directed and edited. Sometimes I find it hard to distinguish between genuinely liking a garment I see and being inspired to make it myself, as opposed to being attracted to the atmosphere the picture represents; usually this atmosphere has very little to do with the reality of life, and the garment plays only a small part of the scene. I interpret my immediate reaction to the photo as my wish to have the way of life portrayed in the picture. Usually the scene is calm, smooth, bright and peaceful, light-years away from my regular, normal, fun but un-glamorous life. Considering the time I have to spend on my hobby is limited, I would like to spend as much of it actually sewing but sometimes I feel so far away from the pretty peaceful lives portrayed in blogs, that it feels like sewing an actual garment will not bring me closer to experience something that beautiful.

However, the truth is that clothes don't REALLY matter, and having beautiful peaceful life has very little (if anything) to do with what we wear. I love clothes, I love sewing, I feel better with myself when I dress nicely, and I absolutely wouldn't trade the time I spend sewing for anything. But the reason I love my life is because I spend it doing what I enjoy and with people I love, and not because it's perfect. I don't live in pictures but in reality, and this is something I sometimes forget. 

The problem is - I wouldn't be the sewist I am or the person I am today, if not for the internet. The inspiration and information is indispensable (not just for sewing, but in almost every area of my life) and therefore I can't and won't give it up. It is probably more like going on a diet - we all must eat, it's just a matter of quantity, quality, and the fact we shouldn't be controlled by it.

Consequently I've been trying to find a better balance between "online sewing" and real-life sewing. More importantly by making a conscience effort to be more aware of what I like and why I like certain types of inspiration, I'm trying to distinguish between patterns and garment that will go well with my everyday wardrobe, and those that are simply beautiful but probably will not fit in my life. 

I hope that by doing so, as well as by managing my online sewing time better, I'll be able to create a happy functional wardrobe and lengthen my attention span so I'll be able to concentrate for longer periods of time on "real life stuff". Managing time is always a problem (especially for self-employed or those who have very little guidance from their supervisors at work!) and I hope the first steps I'm taking now will help me become better at this with time. 

Tuesday, October 14, 2014

The Summer Dress - DONE!

Hi all!


We've just come back after marvelous ten days of hiking, driving, hiking some more and traveling the beautiful villages and cities of northern Greece. It's a bit difficult to return to "normal" life after a vacation, I enjoyed to peace and quite of just being the two of us together without all the "white noise" we all have in our lives. I missed the sewing machine, though. Before living I finished the quilt I've been working on since April and also made the rug, but I didn't hem the black Moss skirt and three Stratchona tshirts I made for myself (and took two of them with me to Greece, un-hemmed...). The night before our flight I also cut fabric for couch-cushions so I do have some WIP I can continue while I ease back into my daily routine. 
One garment I manage to finish before our trip (hem included!) was the black knit summer dress I started two months ago. Fortunately we had a few warmer days before the trip so I wore it a couple of times already, and enjoyed it very much. It was a long process even though it's such a simple dress, mostly because the fear of messing it up made me second guess myself every step of the way. 


I used my self-hacked racer-back sports bra pattern as the base for the back. I used a different dress I have (RTW, almost never wear it) to estimate how much length I should add to the back and front pieces. 

In the above picture the original pattern is demonstrated with the length I added for both the front and the back pieces. The ~1" shorter back pieces is supposed to compensate for my sway-back (a problem I have with most commercial patterns). Since I could only estimate the different in length between the front and the back, and didn't know if I'd like the end result, I didn't trace the pattern and cut the fabric using the above pieces. It's a reciprocal process - I have to use the real fabric rather than start with a muslin because it's a knit fabric, but I feel like I can't cut into the real fabric before I'm sure my measurements are correct. At the end I just decided it would be "good enough for a first try" and cut the fabric. As planned I self-lined the bodice using Sarai's method, just as I did with my sports bra. I cut the pieces for the lining a bit smaller all around hoping the smaller lining will make the seam-line roll inwards. The moment I tried on the bodice I realized how silly I was for procrastinating the project. The bodice fits well, I like it, the seam-lines mostly role inwards as I wanted. 


After making the bodice I re-thought the skirt. Originally I planned using the Lady Skater skirt pieces but I didn't want to complicate things by trying to match the Lady Skater pieces with the waist line of "my pattern". Instead, I traced the general shape of an RTW skirt I have, assuming I could make it work (thankfully, knits are so forgiving!).


I added a lot of length to the skirt (at the end I cut 10 cm from the length I added), and make an FBA (=full butt adjustment) to the back piece, by adding more width and length to the center back. I didn't enclosed the waist seam between the bodice shell and lining as planned, as the bodice was a bit too short and I didn't want to risk it too much. 


Initially I thought the bodice was about 2 inches too short; I felt the racer-back didn't balance the fuller skirt and that more length should be added to the bodice in order for the dress to have better proportions. After wearing it for a while though I started changing my mind. I think the quirky proportions work well for a summer dress, and I can also envision this silhouette in floral fabric with cooler colors for autumn (under a cardigan, maybe even a long one, with boots and leggings). I also have some sparkly black knit I would like to turn into a long sleeve version of this dress (like the Lady Skater, only with the fuller skirt I drafted), but I'm not sure if I can pull off the short bodice in a long-sleeve dress as well. Any suggestions? 


Of course I procrastinated the hem for as long as I could. I started with a blind hem but 20 cm later I realized it was too weak for a dress I intend to wear often, and I was too lazy to continue. It took a few minutes with the tween needle to have a proper hem, and while it is not invisible I still prefer the more durable finish on a knit dress. Have your ever tried hemming a knit garment with a blind hem?
All in all i'm happy with this dress and think the silhouette it worth tracing the pattern and giving it another go.

Costs:
pattern: self-drafted
fabric: 1.5 meters = 37.5 ISL = 10 $
thread = ~2.5 shekels = 0.68 $
Total: 40 ISL = 10.68 $